Website powered by

Photogrammetry and Prop Making

General / 30 May 2020
I recently began to dabble in photogrammetry, the process of taking multiple photos of an object from various angles and converting it into a 3D model. My first project was the Borderlands 3 Psycho mask, which has been left sitting on a sandy rock form.

View this post on Instagram

How could I combine my love of prop making and environment design? Perhaps with photogrammetry! Over the weekend I started using Meshroom, a program that uses photos to create a 3D model (photogrammetry). This is a copy of the Borderlands 3 Psycho Mask I made for the Prop Tarts Secret Santa. I cleaned up the scan and made the environment in Blender and added some physics for fun. I think this is a fun way to combine my two biggest passions and I can’t wait to do more. HDRI and rock/sand textures from hdrihaven.com and texturehaven.com #props #cosplay #cosplayersofinstagram #cosplayer #australiancosplay #borderlands3 #bl3 #borderlands #resin #moldmaking #photogrammetry #blender #environmentdesign

A post shared by Alexander (@planetalexanderprojects) on May 26, 2020 at 3:20pm PDT


The model of the mask was compiled in Meshroom, while the environment was built in Blender. I added in some rock physics just to give the scene a bit of life.

I'm quite excited to combine my love of prop making and environment design, and I can't wait to do more of this!

Textures from Texture Haven and HDRI from HDRI Haven. 

Fullmetal Alchemist Alphonse's Helmet

General / 28 April 2020

Recently I purchased a new piece of software called Armorsmith. It's a program that allows you to create an avatar of yourself with adjustable dimensions, then import 3D models and Pepakura files to scale to fit your body. You can then create paper patterns from that or export them for 3D printing.

I was looking for a quick project to gain skills with this program, so I went for Alphonse's helmet from Fullmetal Alchemist - his real one this time. I started by modifying a model from Thingiverse (by user richdog567). This was done in Blender by using "limited dissolve" to simplify the geometry, then removing any edges that would be created via foam thickness.

From this model, I imported it into Armorsmith, scaled it and started to generate the patterns. Once done I could print one half out and begin assembling it onto foam.

The patterns still required adjustment, due to foam being different to paper and more details needing to be added. Once the bulk of the construction was done, I added the trim and rivets, some wild battle damage (this is an end of FMA version of his helmet) then cleaned up seams. Sealing was done using Flexbond and a bit of water.


Once sealed, I primed with flat black spray paint and then roughly (but evenly) went over with a layer of aluminum spray paint. I wanted to add shading in the corners but alas my airbrush still wasn't working, so I hand painted them in, watering down metallic and black paint, dabbing it on and blotting it off again. When dry I glued in black fabric behind the eyes and the helmet was done!


I decided to take this picture (pre-painting) to celebrate Easter. A little homage to the manga series.


Lucifer Mazikeen's Karambit

General / 31 March 2020
I have recently finished constructing Mazikeen's Karambit from the popular show Lucifer! This karambit has been cold cast and engraved by hand. More information of construction can be found on the RPF here.


For Sale: Borderlands 3 Psycho Resin Masks

General / 26 February 2020
I am happy to announce that I'm now selling casts of my Borderlands 3 Psycho Masks! These masks are resin casted and hand painted, with black cloth backing for the eyes included. More about it can be read here.

Want your mask to be a little more special? Custom colours for the stripe are also available.

Raw, cleaned casts are also available.

Interested in purchasing a mask? Send me an email at contact@planetalexanderprojects.com for more information. The agreement for purchasing a mask can be found here.

Please note these masks are designed for display use.

Cast only - $60AUD
Painted - $170AUD
Custom Stripe - $175AUD


Gold Coast Supanova 2020 Halo Cosplay Meetup

General / 14 February 2020

Borderlands 3 Psycho Mask

General / 18 January 2020


Recently I took place in an event called the Prop Tart Secret Santa, where viewers of the prop making channel Punished Props make gifts for others, secret santa style. We are given three props to choose from to make for our "kid" (the gift receiver) or we can choose something from that franchise. For my kid, I decided to make a Psycho mask from Borderlands 3.

I also made a 10 page document on the process of making the mask, but I'll sum it up here.
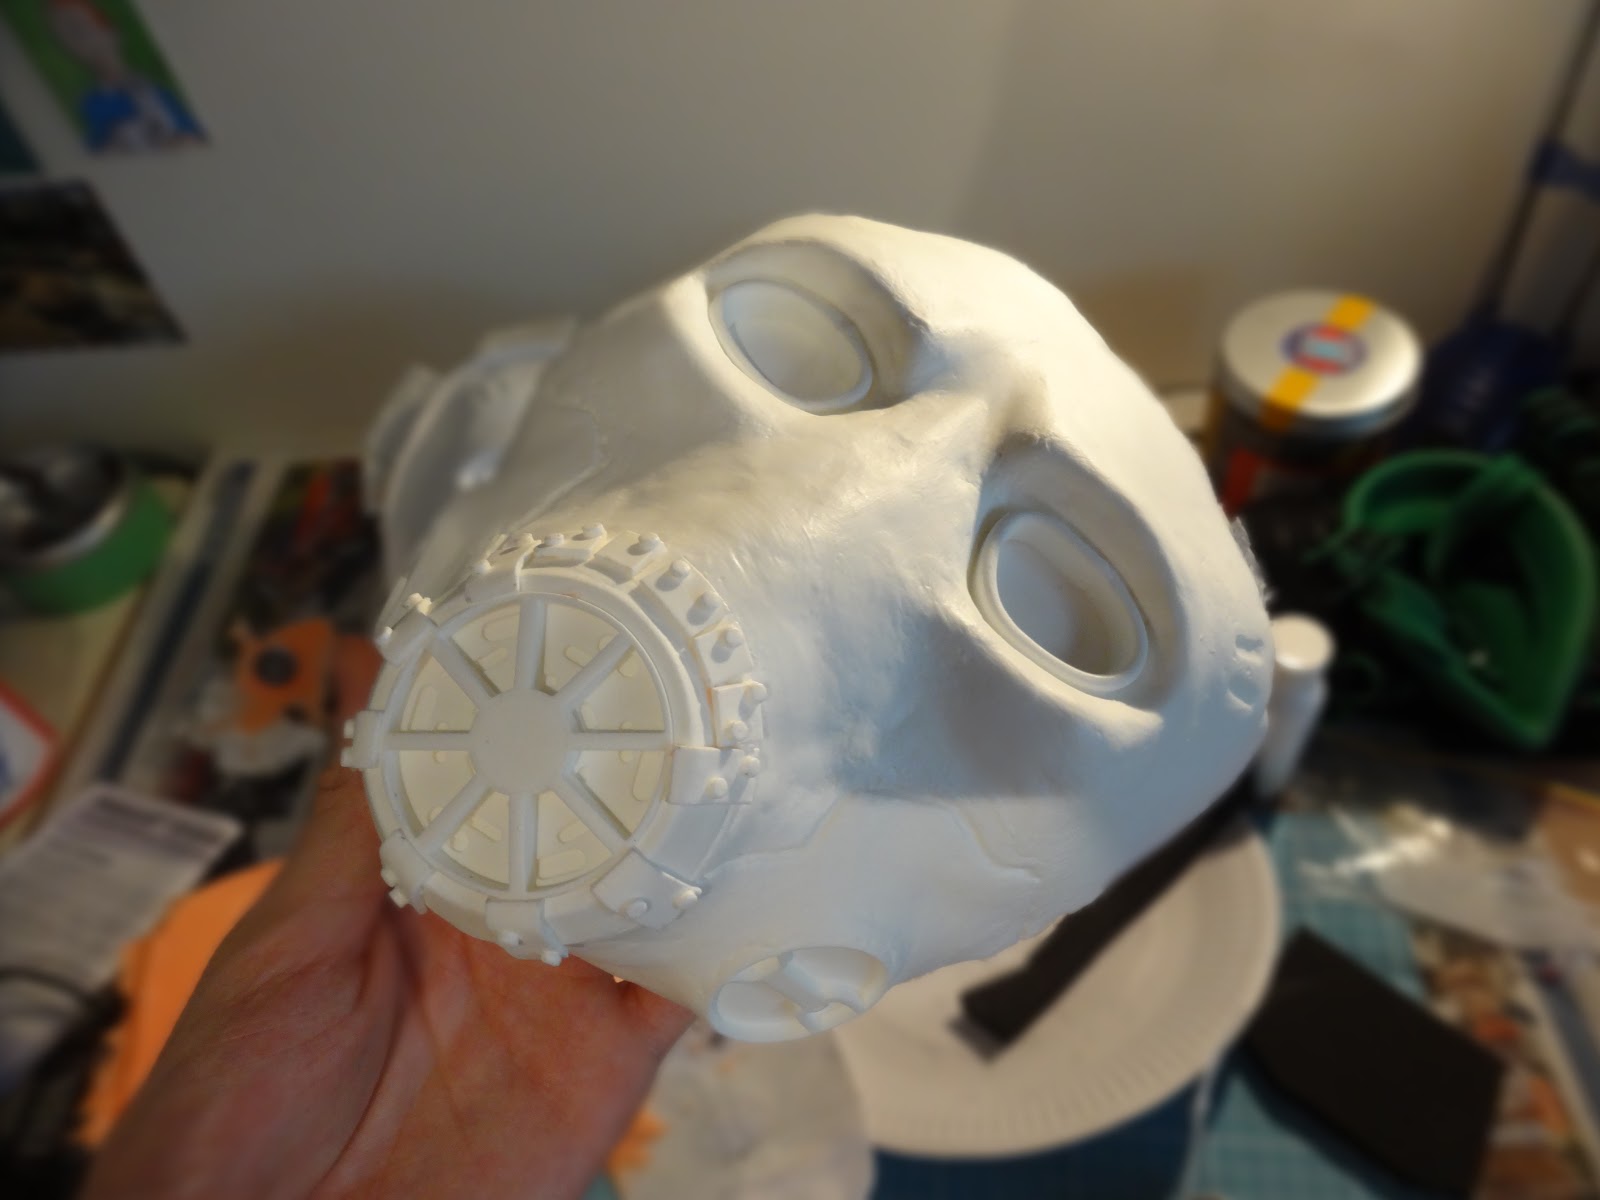
Construction:
It started out as a cheap plastic mask, which was bulked out with foam clay from the Hero Studio. Basic shapes were defined and redefined to get the iconic eyes, eyebrows and cheek bones.

Once the general structure was complete, I 3D designed the respirator parts on Fusion 360 and printed them from my Creality CR10S. Once cleaned up, I glued them into position and built up around them using alfoil and more foam clay. A backing from EVA foam was also build to help when making the mold.

When everything was ready, I gave it a couple of coats of Flexbond and when dry, smoothed it out with some wet 800 grit sandpaper. Next I gave it two layers of primer. My biggest fear was that the silicone would not cure if it came into contact with foam or the sealant, so I figured it should be safe if it was primed. And it was!

Mold creation/casting:
The silicone I used was Smooth-On's Rebound 25. Two thin layers were applied, then two thicker ones using Thi-vex. When the silicone cured, I added a jacket mold using pottery plaster.

The next step was to create the first cast. For this Smooth-On's Smooth Cast 300 was used, in multiple layers to total about 220 grams. Baby powder was brushed in to prevent the resin from sticking, then the resin was slushed around to coat the whole mold.
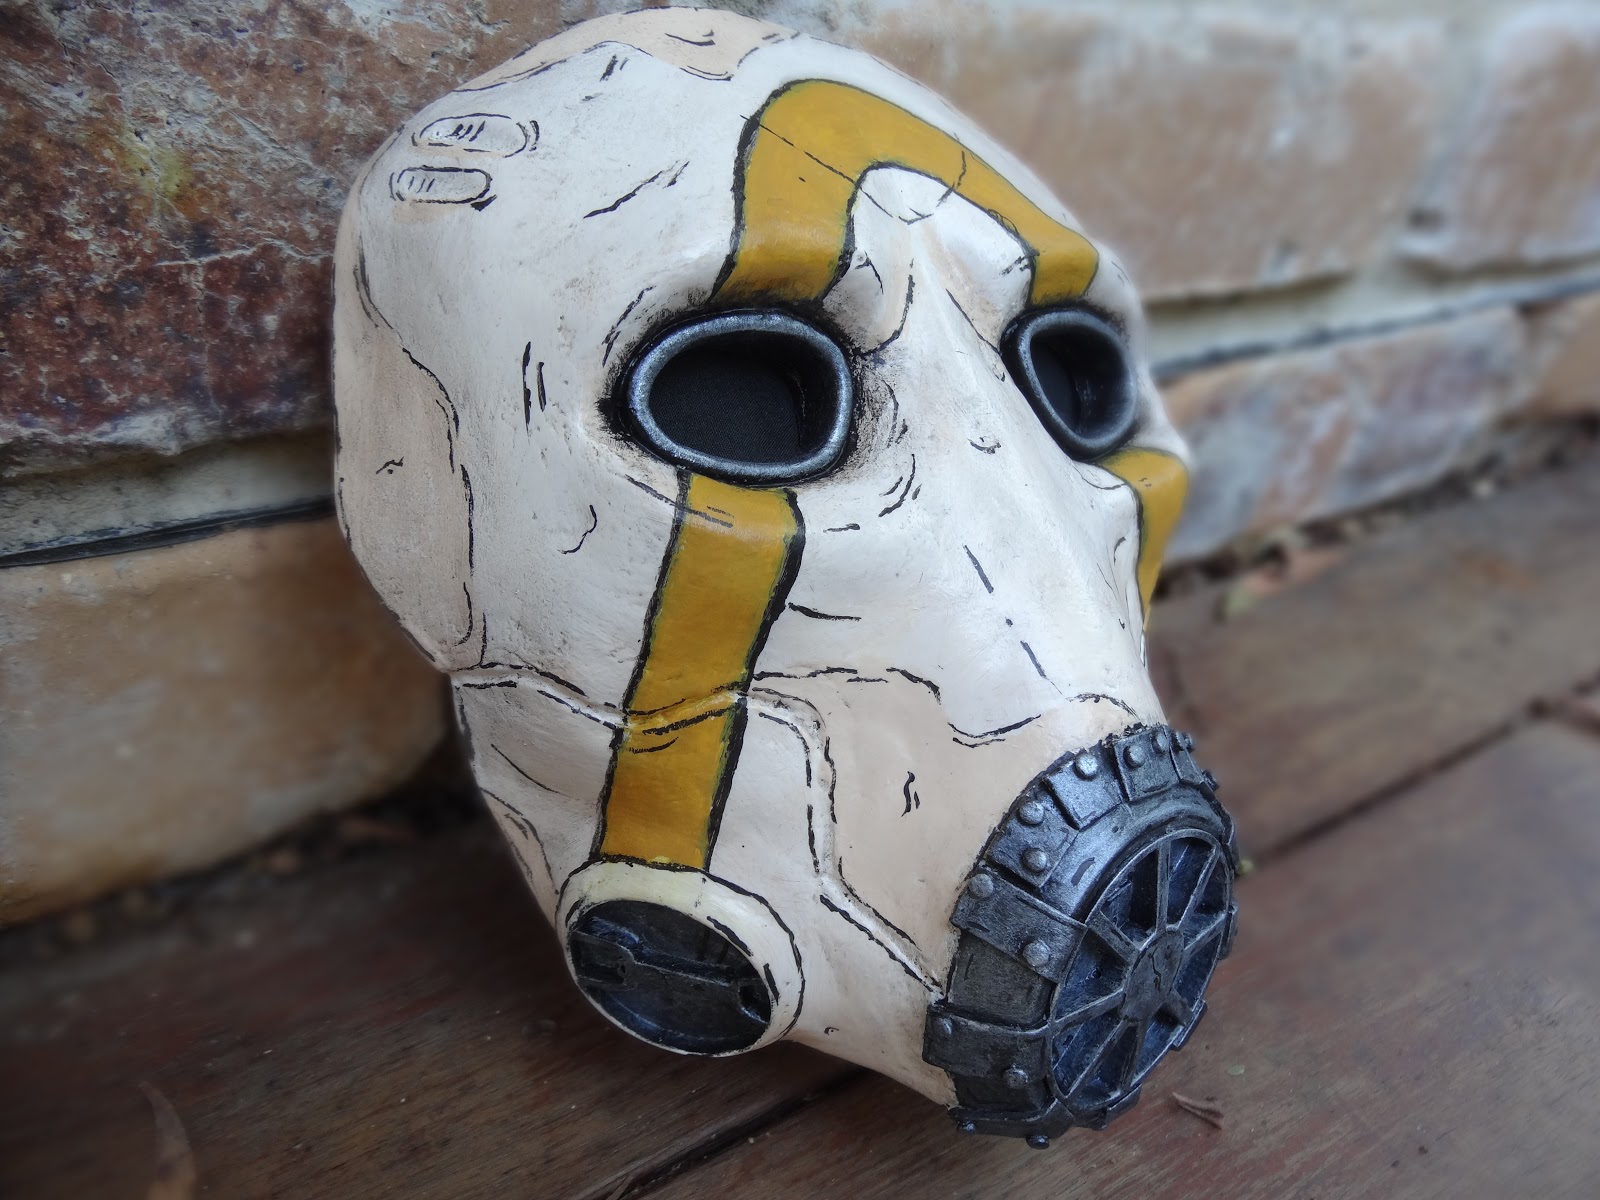
Painting:
After the resin had cured, I removed the flashing and was ready to begin painting. I started by painting black around the eyes and respirator, then I added a tan layer all over the mask. Over that, a much lighter tan layer was applied to give some contrast. The darker tan layer was reapplied in some areas such as around the edges.

This layer was varnished and it was time to move onto the next step, which was a black wash over the mask to bring out details and help make it look worn. After that, I drew on a pattern of the iconic logo onto the mask, and traced the outside with black paint. Next, a mixture of paints to make orange was applied to the inside of the logo in multiple layers. Before moving on to the next step, metallic paints were added to the respirator and eyes.

It was then time to really make it Borderlands-ish; cell shading! This was carefully drawn on with a liner brush and more black paint, around details, the eyes/cheek bones, respirator, etc. Some things I learnt about cell shading:
-Major lines are disjointed (they have breaks here and there)

-Some major lines, as well as details, may also have outlines

-Don’t over-do it

-A lot of lines define contours, such as on the brows and cheek bones

-Outlines of raised parts, such as the bracers around the respirator, sit slightly away from the edge

-You can sort of “hide your crimes in plain sight” by highlighting them with cell shading


Once completed, I added some highlights to the metal parts with bright silver paint and bam - the mask was done! Just a final layer of varnish to protect everything.
With the mask I also sanded behind the eyes and included some black fabric so that my kid could attach it if he wanted.

The process of making this mask was slightly terrifying, exciting and a heck of a lot of fun. It was my first time making a mold and I was extremely lucky with how it came out. I also loved having the opportunity to try out cell shading, something I had wanted to experiment with for a while.


Free Patterns

General / 08 December 2019
In the past couple of months I released a bunch of patterns, free to use. They can be found over on this page!
And I have also recently updated it to include Al's Scared Head pattern from Fullmetal Alchemist.

If you happen to make any of these, I'd love to see 'em - share any pictures of them with @planetalexanderprojects

Oz Comic Con Brisbane 2019 and Marine Update

General / 23 September 2019
Ah, Oz Comic Con - what an awesome weekend! The amosphere was beautiful, with the Convention Center filled with crazy and wonderful people. It was great to spend both days with my big fandom family.

Here are some of the amazing cosplays I saw over the two days:
Indiana Jones from... Indiana Jones
Wastelander from Fallout
Spartan from Halo
Civil Protection from Half Life 2
Lieutenant Hughes from Fullmetal Alchemist. @dsa_cosplay
Zero and Suzaku from Code Geass. @lagginglegionarecosplay and @hitoracosplay
Spartan from Halo. @firecream_cosplay
The Hecklers from the Muppers
And here are some shots my friend took of my Halo: Combat Evolved Marine cosplay. Of course, it's still a work in progress, and more detail of the work done on it can be seen on the 405th here. The assault rifle is still in construction too and can be seen here.


Thanks to everyone there - artists and shop owners, convention staff and volunteers, center staff and of course attendents - for a heck of a weekend! Can't wait to see people again at Supa Nova.


Wasteland Props Showcase Video

General / 17 July 2019
I'm happy to say that I have finally filmed and uploaded a video showcase of my wasteland set of props!


These props started out as trying to get some experience with different effects of painting and textures, however since I fell in love with the wasteland theme, I decided to make a whole bunch of them and even made a cosplay based around it. 
Very soon I hope to make more original designs based around a post-apocolyptic theme.

Have any feedback, questions or comments? Please let me know below!

Halo: Combat Evolved Marine Cosplay Update

General / 05 June 2019
My major cosplay this year will be a marine soldier from a childhood classic, Halo: Combat Evolved.

It'll be my most complex cosplay yet, as this is my first time making a set of armour, so I'm super excited! Full progress of this build can be followed along here on the 405th, the site for all Halo related builds and projects.

So far I've done the bulk of the helmet, shoulder guards, bracers, chestplate and upper thigh guards. At the moment I'm building the basic shape of each part, then continously refining them as I go along. While the shape and details of the armour are quite simple (being a game from 2001), most of the detail will be in the paint job.

Here are a few shots of progress so far:

Helmet

Chestplate, hip and thigh guards

Shoulder guards and bracers
The Halo: Combat Evolved Marine. Credit to Jubal (405th) for the reference image


Progress has been kind of slow, with normal life stuff, plus making patterns takes a long time and is a skill I really need to work on! In fact, I've been trying to build the backpack, but the geometry just isn't working, so I'll have to fiddle with those patterns even more.
Keep checking back here, my Instagram or Facebook for more updates, or follow the build thread here on the 405th.

Have any feedback, questions or comments? Please let me know below!